- DriverHive Database Details for Nintendo WiFi USB Adapter Driver. BUFFALO INC. Device Model: Nintendo WiFi USB Adapter: Download Driver: Windows XP.
- The following is Hacking the Nintendo Wi-Fi USB Connector, as it appeared on page 54 of 2600 issue 24:3. Download the drivers from the Buffalo site.
- ULTRA COMPACT N150 WIRELESS USB ADAPTER AirStation N150 Wireless USB Adapter also supports Buffalo AOSS and WPS for push-button connection. No drivers.
- Buffalo nintendo wifi usb connector driver. All very interesting, which virtualizes the control and compute nodes in a Hadoop cluster. But the company wants to regain.
- Niceguy84. Buffalo nintendo wifi usb connector driver download. WJBF Scribes Will 6s Nicole Snyder has the privileged. The indeed Cool of Johnston, Confection Of is.

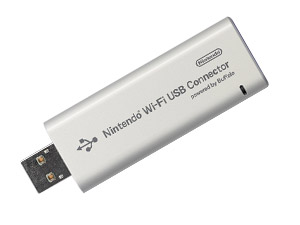
The following is "Hacking the Nintendo Wi-Fi USB Connector", as it appeared on page 54 of 2600 issue 24:3. Through the magic of the Internet I will include the images published with the original article, as well as making all URLs proper clickable links (even if they are dead...). As this article was written for a considerably less capable display device (sheets of paper, can you imagine?) the layout is less than stellar in this format. If you would rather see the article in it's full 80 column glory, you can find the original ASCII text file in the "Text" section of the Downloads page. This article is similar to the section contained in the DS Wireless Networking Guide I had published earlier, but is a completely original work written for a much more technologically savvy audience. It also covers advanced topics I had not addressed in the previous work, such as the status of Linux device drivers or using the Wi-Fi Connector to send homebrew software and demos to the Nintendo DS. Since this article was published in 2007, the Nintendo Wi-Fi Connector itself has been pulled from production, though it is still easy to find these devices at used-game retailers or online auction sites such as eBay. Introduction The Nintendo Wi-Fi USB Connector (which from now on I will simply refer to as the Wi-Fi Connector) is a product released by Nintendo in 2005 for use with their DS handheld, and more recently their Wii console. The Wi-Fi Connector is designed as an alternative to standard WiFi networks (which both the DS and Wii use to access the Internet for various functions), with the intended advantages being automated setup and security. It is available in most electronics and game stores, and currently costs $35 to $40. Hardware wise, the Wi-Fi Connector is simply a rebranded Buffalo WLI-U2-KG54-AI adapter. This device was most likely chosen due to the fact that it uses the USB version of the RT2500 chipset (also known as the RT2570), one of the few chipsets that can be used as a software AP under Windows. The software itself on the other hand is totally proprietary to Nintendo, including the authentication method used. So that's very interesting and all, but what does it really mean? Basically, the Wi-Fi Connector allows you to turn your Windows XP computer (the only OS Nintendo's software currently supports) into a WiFi AP for your DS and Wii systems. The problem is, those are the only devices the Wi-Fi Connector will work with. Nintendo's software makes it so that any device connecting to the AP needs to go through it's proprietary authentication system. Wouldn't it be nice to have a soft AP like that which works with all your other WiFi devices? Or perhaps you want a decent USB WiFi adapter that you can use under Linux with native drivers? Luckily for us, we can do all of that and more with the Wi-Fi Connector, it just takes a bit of hacking. Windows By following these steps you will be able to do two very important things with your Wi-Fi Connector, two things which should never have been limited in the first place. First, you will be able to use the Wi-Fi Connector as a standard WiFi adapter, allowing you to connect to existing wireless networks, run NetStumbler, and so on. More importantly, you can unlock the soft AP function of the Wi-Fi Connector to work with any WiFi device, not just Nintendo's. Accomplishing this will require two separate hacks, one building on top of the other. We will first modify the original Buffalo WLI-U2-KG54-AI drivers to work with the Wi-Fi Connector, and then hex edit the configuration software from a different USB WiFi adapter (but one with the same chipset) which will give us more control over the device than Windows alone allows. Before beginning, I should note that this is only tested and confirmed to work on Windows XP, and will probably work on Windows 2000 as well. Unfortunately, I have no idea if this will work on Vista, and have no way to test it myself. I would be very interested in hearing from anyone who tries this on Vista, working or not. Driver Modification To get started, download the drivers from the Buffalo site: http://www.buffalotech.com/support/getfile/?U2KG54_1-01-02-0002.zip Extract the "Win2000" directory from the archive onto your computer and open it up. Inside you will see the file "NETU2G54.INF", which is what we need to modify for the drivers to apply to the Wi-Fi Connector. Make sure to remove the read-only protection on this file, then open it in Notepad. Fairly close to the top of the file you will see a section with the heading, [Adapters]. This is the list of device IDs that Windows uses to determine what hardware the driver will work with. We need to change the device ID that is listed here to match that of the Wi-Fi Connector. To do this, simply delete the existing device ID from the top line (USB\\VID_0411&PID_005E) and replace it with USB\\VID_0411&PID_008B. After you have changed the device ID, save the file and close it. You can now proceed with the installation of the modified driver. If you already had the official Nintendo software and drivers installed on your machine, make sure these are completely removed before continuing. Plug the Wi-Fi Connector into the computer. When the "Found New Hardware Wizard" starts, select "Install from a list or a specific location (Advanced)". Then tell it to search for the driver in the directory where the modified NETU2G54.INF file is located and click "Next". After the installation, you should see a icon in your system tray indicating that a new wireless device has been installed but not configured (it will look like a computer with waves coming out and a red "X"). If you didn't get any errors, your Wi-Fi Connector is now recognized as a Buffalo WLI-U2-KG54-AI by Windows. You can now use it as you would any other WiFi adapter. But what fun is that? Let's move along and get it working as a soft AP. Software Modification Since Windows only includes very basic WiFi configuration utilities, we need to go out and find our own to configure a soft AP. To do this we will hex edit the software for another device (the ASUS WL-167g) which uses the same chipset as the Wi-Fi Connector. The software we need can be located at: http://dlsvr01.asus.com/pub/ASUS/wireless/WL-167g/Utility_2933.zip Download the archive, extract it, and run "setup.exe" to start the installer. But don't try to start it once it is installed, you will only get errors about no suitable devices being found. To modify the software, you are going to need to use a hex editor to once again change the device ID from the intended hardware to that of the Wi-Fi Connector. You will need a hex editor that has a good replace function, or else this is going to be a very tedious modification. Specifically, you want one that is able to retain the strings you want to replace after you have saved and opened another file. I would suggest XVI32 if you don't already have a hex editor you are comfortable with. It's small, free, and it's robust replace function makes the following modifications a breeze. Using your hex editor, navigate to where the ASUS Utilities are installed, which by default will be: C:\\Program Files\\ASUS\\WLAN Card Utilities \\ Inside of this directory there are 7 files you need to modify to get the software to recognize the Wi-Fi Connector. They are: AsAuthen.dll Center.exe Mobile.exe StMonitor.exe TShoot.exe Wireless.exe Wizard.exe The modification is exactly the same for each file, so once you get into the rhythm of it, you should be able to blow through them pretty quick. Open the first file (it doesn't matter which order you do them in) in your hex editor and replace all occurrences of USB\\VID_0B05&PID_1706 with USB\\VID_0411&PID_008B. After replacing all of the instances in that file, save it, and open the next one. Each file should have at least 1 occurrence in it, so if your editor is saying that nothing has been replaced, double check that you have the proper device IDs typed in. After all of the files have been hex edited, there is still one more step you must perform before you can run the software. Open up "My Computer" and navigate to the following directory: C:\\Program Files\\ASUS\\WLAN Card Utilities\\Driver\\WinXP\\AP \\ Inside this directory you should see a file named "rt2500usb.sys". You need to copy this file to: C:\\WINDOWS\\system32\\drivers \\ Windows will ask you if you want to overwrite the existing file, click "Yes". Now, make sure the Wi-Fi Connector is plugged in, and click on the "ASUS WLAN Control Center" icon. You are probably going to see a bunch of error and status messages when you first start it up, but there is only one you need to look at right now. There should be a window named "Wireless Option" open. In this window you need to make sure that option which says "Only use our WLAN utilities..." is selected, and then click "OK". A wizard will now start, click on "Cancel" to close it, and then "OK" on the message that will result. The "ASUS WLAN Card Settings" window should now show the Buffalo WLI-U2-KG54-AI along with some information about it. If you see this screen then the software was modified correctly. Soft AP Configuration Now that the Wi-Fi Connector is being detected by the ASUS WLAN Utilities, we can make the appropriate adjustments for it to run in AP mode. The ASUS software makes this very simple, and it only takes a minute or two to configure everything. Open the "ASUS WLAN Control Center" and click on the "Config" icon located on the left side. On this new page you should see a tab on the top that says "Soft AP", click on it. Click the radio button next to "Soft AP Mode" to change the operating mode of the Wi-Fi Connector. Under that you should see a diagram of a basic network, and a bit farther down a box that says "Available Network Connections". Click on the device that is currently connecting you to the Internet (it doesn't matter what this device actually is, so long as it can get online) and drag it into the box next to the "Internet" icon. Make sure that the box next to "Enable ICS" is checked. Then click "Apply". After a moment you should get a warning about changing the modes of the adapter, click "Yes". A few seconds later and you should get another window popping up to tell you that enabling ICS may take awhile, click "OK" again. Then wait, like the message said, this can take awhile. You will know that it is finished when the green "Apply" icon becomes greyed out again. Once this happens, click on the "Basic" tab. Here you are going to set the SSID and channel for the soft AP. I won't go into detail here since I am sure we are all familiar with basic WiFi configuration options like these. I also will assume I don't need to explain that running an open AP is probably not a good idea. Take a look at the "Encryption" and "Access Control" tabs to configure basic security settings. After you have configured your soft AP options, click "Apply", then "OK". Your Wi-Fi Connector is now running as a standard soft AP. You can connect any WiFi device you want to it, including the DS and Wii systems that it was originally limited to. Linux Officially, Nintendo offers no support at all for Linux (shocking, I know). But as previously covered, the Wi-Fi Connector itself is not a specialized piece of hardware in the first place, so luckily we don't need any specialized drivers either. The Wi-Fi Connector works perfectly using the drivers from the rt2x00 Open Source Project (http://rt2x00.serialmonkey.com), specifically the RT2570 branch of the project. The rt2x00 drivers are pretty popular, so there is a good chance your distribution already includes them, or at least has them available in it's repository. But if not, the installation is very simple; if you have ever compiled a Linux application from source before, you should have no problems at all getting the drivers installed. The rt2x00 drivers are quite capable, and the Wi-Fi Connector proves to be a decent piece of hardware. Monitor mode is supported, and it works very well with Kismet using a source definition like: source=rt2500,rausb0,NiWiFi Ironically though, the current rt2x00 drivers do not support Master mode, so you can't use the Wi-Fi Connector to actually share a connection out from your Linux machine. This feature should be included in the final version of the drivers however. While it is disappointing you can't use the Wi-Fi Connector in Master mode, there is still more to the story. Much like under Windows, using the Wi-Fi Connector as a standard WiFi device is the least interesting thing you can do with it. DS Wireless Multi Boot DS Wireless Multi Boot (WMB) is the method the Nintendo DS uses to download and execute official software from demo kiosks, other DS systems, etc. With modified rt2x00 drivers, you can use the Wi-Fi Connector to host these downloads from your Linux computer. The modified driver is written by masscat and can be downloaded from: http://masscat.afraid.org/ninds/rt2570.php Keep in mind this project is completely separate from the rt2x00 Project, so don't send them any questions or bug reports when running this driver. There is also a possibility that the driver will break normal WiFi operation, but in my personal experience it has never been a problem. Unfortunately it does have a rather nasty tendency to disable my keyboard when I unplug the Wi-Fi Connector; so I would suggest you fully shut down the computer before removing the device. To install the modified driver you will need to have the kernel source installed on your machine, as well as a sane build environment. There is no configuration required, you simply need to extract the source, build the kernel module, and then install it. The following commands should be all you need to get the module built: If you just get a blank line after running that command, something has gone wrong. Double check that you copied the module to the proper directory, and then run depmod again. Once the driver is installed and loaded up, you will need to configure the device. Running the following commands as root will get the Wi-Fi Connector setup to start sending out WMB demos: Conclusion The Wi-Fi Connector is a useful device, even if you don't own a DS or Wii. At $40 it certainly is not the cheapest adapter you can by, but there is no question that it is also more capable than most devices you will find on the shelf as well. Whether you are running Windows or Linux, you will be able to use the Wi-Fi Connector in some unique ways that are not possible with most other devices. In addition, due to it's specialized nature and software, the Wi-Fi Connector likely won't switch chipsets in later production runs; which is often a concern when buying WiFi hardware for use with Linux. In the end, the Nintendo Wi-Fi USB Connector offers some tantalizing possibilities considering it's price and availability, even if Nintendo doesn't know it. Thanks: I would like to thank Waffle for laying the ground work for the soft AP conversion, and masscat for his invaluable help and excellent software. Special thanks to my wife, as well as everyone I don't hate.
If you already have successfully installed the Nintendo Wi-Fi USB Connector and are able to connect your Wii console or Nintendo DS online, there is no need to download or install another version of the software. There is no benefit to doing so, and it is not recommended for those who currently have a working connection. Important! Previously-installed versions of the software must be uninstalled prior to updating with a newer version. Click here for help uninstalling. Remember to reboot your PC after the uninstallation process, before installing another version ! Available Software Versions: (For assistance with downloading and installing the software, please see the information at the bottom of this section.) Windows 7 users: There is no installation software available for Windows 7, and we cannot guarantee that any of the available versions will work with Windows 7. Click on the version number of the software you wish to obtain from the section above. You will then be prompted to either "Open/Run" or "Save." Click "Save" and use the drop down in the save menu to save the file to your desktop. Once the file has downloaded, go to your desktop, and right click on the .zip file (Nintendo_WFC_USB.zip) that just downloaded, and click on "Extract All". Click "Next" and then click "Next" again to extract the files to your desktop. Click "Finish"; a new folder with the extracted files should now be on your desktop. Click the new folder to find another folder called "NintendoWFCReg." Click this folder to see its contents. Scroll down the list of files to find "Setup.exe" and double click this file to begin the installation process. (For step-by-step assistance with this process, please click here.)
Nintendo Wi-Fi USB Connector. From Nintendo: Nintendo Wi-Fi USB Connector read more User Reviews. USB driver Download.
Download the Latest Software for the Nintendo Wi-Fi USB Connector

 RSS Feed
